# Landers

> Add the prelanders that warm up your visitors for your offers, and see which ones convert best.

This page shows you how to add your landers, also called prelanders: the pages visitors see after they click your ad and before they reach your offer.

A lander warms visitors up. It might be a quiz, a review, an article, or a short sales page, with a button that sends them on to the offer. Add each lander once and use it in as many campaigns as you like. Proferex then shows you which lander gets the most visitors through to the offer, and which one makes you the most money.

A lander only tells the Tracker which page to show and track. To build and host the pages themselves, from a single landing page to a full website, use [Landing Pages](/docs/landing-pages/lander-uploads/index.md). Any page you publish there can then be picked as a lander.

You don't need a lander. Sending visitors straight from the ad to the offer is called a direct offer. In your combination, pick **Direct Offer (No Lander)** instead of a lander. If that's your plan, skip this page and go on to [Combinations](/docs/tracker/combinations/index.md).

Go to **Tracker → Landers** to see yours. Click **Create Lander** to add one, or **Bulk Add Landers** to add many at once.

![Landers selected in the sidebar, and the Create Lander button outlined](/images/docs/quick-start-landers-1.jpg "Tracker → Landers")

---

## Add a lander

Click **Create Lander**, give it a name you will recognise in reports, such as `Roof Check - Quiz`, and pick its **Type**. The type is where the page lives:

| Type | Use it when |
|---|---|
| **Published Pages** | The page is hosted on Proferex. See [Published Pages](/docs/landing-pages/published-pages/index.md). |
| **External Hosted** | The page is hosted somewhere else, such as your own website or another page builder. |
| **Blog** | The page is an article or page on your Proferex blog. |

![The Create New Lander form with the name Roof Check - Quiz and the Type list open, showing Published Pages, External Hosted, and Blog](/images/docs/landers-type.jpg "Pick where the page lives")

What you fill in next depends on the type you pick. Each one is explained below.

### Published Pages

Pick the page under **Select Published Page**. Pages are listed by their [Lander Upload](/docs/landing-pages/lander-uploads/index.md) and name, such as `Roofing Lander > Roof Check - Quiz`: the upload is Roofing Lander, and the page is Roof Check - Quiz. Only pages you have published are in the list, so publish the page first. See [Published Pages](/docs/landing-pages/published-pages/index.md).

![The Select Published Page list open, showing Roofing Lander > Roof Check - Main and Roofing Lander > Roof Check - Quiz](/images/docs/landers-pick-page.jpg "Pick a published page")

Once you pick a page, Proferex shows everything about it:

![The published page details: Lander Upload and Published Page names with Open in File Manager, the Published Page ID with a copy button, Base URL, URL Parameters, the tracking parameters, and Full URL](/images/docs/landers-page-form.jpg "The page you picked, and its address")

- **Lander Upload** and **Published Page** show which upload and page you picked. **Open in File Manager** opens the upload, so you can edit the page's files. See [File Manager](/docs/landing-pages/file-manager/index.md).
- **Published Page ID** is the page's ID. Click the copy icon next to it when you need it for a [bulk upload](#add-many-landers-at-once).
- **Base URL** is the page's address on your [page domain](/docs/landing-pages/page-domain/index.md). If you have more than one page domain, switch between them with the icon next to it.
- **URL Parameters** is optional. Use it to pass details about the visitor to your page. For example, `country={country}&city={city}` sends the visitor's country and city. See [Tracking parameters](#tracking-parameters).
- **Full URL** is the address the visitor lands on: the Base URL with your parameters added after a `?`.

Click the icon to the right of **Base URL** or **Full URL** to open the page in a new tab and check it.

### External Hosted

Paste the page's address into **External URL**, such as `https://www.yourbrand.com/roof-check`.

![The Create New Lander form with Type set to External Hosted, the External URL outlined, the tracking parameters, and the Offer Link](/images/docs/landers-external.jpg "Paste the page address")

You can add [tracking parameters](#tracking-parameters) to the address too. External Hosted landers have no **Redirect Mode**, because they always open on their own website.

### Blog

Use this type to send visitors to an article or page on your Proferex blog. If you don't have a blog yet, see [Create a Blog](/docs/blog/create-a-blog/index.md). To write the article or page first, see [Write and Publish](/docs/blog/write-and-publish/index.md).

![The Create New Lander form with Type set to Blog, Redirect Mode set to With Redirect, and Select Blog and Content outlined](/images/docs/landers-blog.jpg "Pick a blog, then an article or page")

Pick your blog under **Select Blog**. Then, under **Content**, choose **Articles** for your blog posts or **Pages** for your blog's other pages, such as its home page.

![Select Blog set to Roofing Guide, and the Content list open with Articles and Pages](/images/docs/landers-blog-content.jpg "Choose Articles or Pages")

Now pick the one you want under **Select Article** or **Select Page**. Type to search if the list is long.

![Select Article open, listing roofing articles such as How Much Does a New Roof Cost in 2026?](/images/docs/landers-blog-article.jpg "Pick an article")

![Content set to Pages, and Select Page open, listing Home, Privacy Policy, and Terms of Service](/images/docs/landers-blog-page.jpg "Or pick one of the blog's pages")

**Blog URL** then shows its address.

You don't need to add an offer link by hand. In the blog editor, select your call-to-action text and click **Offer Outgoing Link**. See [Offer Redirect](/docs/tracker/offer-redirect/index.md#blog).

---

## Send visitors on to the offer

Every lander needs a button or link that sends visitors on to the offer. Near the bottom you will find your **Offer Link**. Click the copy icon next to it, and use it as the link on your call to action:

![The Offer Link box with the link and its copy button outlined](/images/docs/landers-offer-link.jpg "Copy the Offer Link")


```html
<a href="https://track.yourbrand.com/outgoing">Get The Offer</a>
```

Proferex records the click and sends the visitor to the offer picked for them. Which offers that can be is set by the [combinations](/docs/tracker/combinations/index.md) you use in your [campaigns](/docs/tracker/campaigns/index.md), not by the lander. You never put an offer's own address on your lander, so one lander works with any offer, and you can change offers in your combinations without editing your page.

Got more than one tracking domain? Use the icon next to the link to switch to the one your campaign uses. It's simplest when your campaign link and Offer Link share a domain.

If they don't, Published Pages and Blog landers still track on their own. External Hosted landers need one extra line on the page: the `tracker.js` script. [Offer Redirect](/docs/tracker/offer-redirect/index.md) has the line to copy.

---

## Redirect Mode

**Redirect Mode** decides what happens when someone clicks your campaign link. Proferex either redirects them from the campaign link to the lander's own address, or loads the lander right on the campaign link, with no redirect. You find it right under **Type** on Published Pages and Blog landers. External Hosted landers don't have it, because they always redirect to their own website.

![The Redirect Mode list open under Type, with No Redirect and With Redirect, and With Redirect selected](/images/docs/landers-redirect-mode.jpg "With Redirect is the default")

- **With Redirect** sends visitors from your campaign link to the page's own address, such as `pages.yourbrand.com/roofing-lander/`. This is the default.
- **No Redirect** loads the page on the campaign link itself, such as `track.yourbrand.com/l/your-alias/roofing-campaign`. Visitors never pass through a redirect.

Ad platforms such as Meta and Google are strict about ads that redirect, so **No Redirect** is a good fit for traffic from them. Both modes track the same.

---

## Tracking parameters

Tracking parameters pass details about each visitor to your lander, such as their country or the traffic source's campaign. Your page can then use them, for example to show "Free roof checks in Texas" to a visitor from Texas.

Type the name your page expects, such as `country=`, then click a parameter under the URL to add its value. Proferex fills each one in for every visitor.

![Click to add tracking parameters, with buttons from clickid and campid to trafficsource and referer](/images/docs/landers-tracking-params.jpg "Click a parameter to add it to the lander's URL")

| Parameter | What it holds |
|---|---|
| `{clickid}` | Proferex's click ID |
| `{campid}` | Campaign ID |
| `{campid_short}` | Short campaign ID |
| `{campaign_slug}` | Campaign slug |
| `{landerid}` | This lander's ID |
| `{offerid}` | ID of the offer picked for the visitor |
| `{custom_token}`, `{custom_token2}`, `{custom_token3}` | Your custom tokens. See [Custom Tokens](/docs/tracker/custom-tokens/index.md) |
| `{v1}` to `{v10}` | The values your traffic source sent in its v1 to v10 rows. See [v1 to v10](/docs/tracker/traffic-sources/index.md#v1-to-v10) |
| `{externalid}` | The traffic source's click ID |
| `{cpc}` | What the click cost |
| `{country}` | Country code |
| `{city}` | City |
| `{region}` | Region or state |
| `{isp}` | Internet provider |
| `{ip}` | IP address |
| `{continent}` | Continent code |
| `{postal_code}` | Postal or ZIP code |
| `{timezone}` | Timezone, such as America/New_York |
| `{language}` | Browser language |
| `{device}` | Device name |
| `{device_type}` | Device type |
| `{os}` | Operating system |
| `{os_version}` | Operating system version |
| `{browser}` | Browser |
| `{browser_version}` | Browser version |
| `{conntype}` | Connection type |
| `{trafficsource}` | Traffic source name |
| `{referer}` | The page the visitor came from |

For example, this URL passes the visitor's country and city to your page:

```text
https://www.yourbrand.com/roof-check?country={country}&city={city}
```

You don't need any of them to track your lander. Proferex tracks it either way.

---

## Lander group

Groups keep related landers together, for example all your landers for one offer or one country. You can then filter your landers by group, and compare groups in [Analytics](/docs/reports/drill-downs/index.md).

To make a new group, type its name in **Lander Group** and click **Create**. You can also make one straight from the Landers page: click the **+** next to **Filter by Lander Group**, type a name, and click **Create**.

![The plus button next to Filter by Lander Group, and the New lander group box with a Group name field, Cancel, and Create](/images/docs/landers-group-filter-create.jpg "Make a group from the Landers page")

**More** also has a **Notes** box for anything you want to remember about the lander, such as what you are testing. You can also read and edit notes on the lander's own page.

Click **Create Lander** to save.

![The Cancel and Create Lander buttons at the bottom of the Create New Lander form](/images/docs/quick-start-landers-4.jpg "Save the lander")

---

## Add many landers at once

Click **Bulk Add Landers** to add a whole list of landers in one go.

![The Bulk Add Landers dialog with Add Row, Upload CSV, Download Template, and Clear All, the help text, and one empty row](/images/docs/landers-bulk-add.jpg "Type your landers in, or upload a CSV")

- **Add Row** adds an empty row to fill in.
- **Upload CSV** fills the rows from a spreadsheet. Click **Download Template** first to get a file with the right columns. If you already have rows filled in, Proferex asks before replacing them.

Each row needs a **Name** and a **Type**, plus what that type needs:

| Type | `type` column | Also needs |
|---|---|---|
| Published Pages | `html` | The Published Page ID in `hosted_page_id`. The page domain in `lander_domain` is optional: leave it empty to use the page's own domain, or your main page domain |
| External Hosted | `external` | The page's address in `lander_url` |
| Blog | `blog_article` | The Blog ID in `blog_id`, and the Article ID in `article_id`. For a blog page instead, set `content_type` to `page` and put the Blog Page ID in `blog_page_id`. The blog's domain in `blog_domain` is optional |

To get a published page's ID, pick the page in **Create Lander** and copy its **Published Page ID** into the `hosted_page_id` column. See [Published Pages](#published-pages) above. Any lander group you use must already exist, so create it first. **Redirect Mode** is **With Redirect** unless you change it. **Notes** is optional.

If a lander with the same name already exists, or two rows in your list share a name, choose what to do with it:

- **Cancel** skips that row.
- **Replace** updates the existing lander with the details in the row. Any column you leave empty, such as the group or notes, is cleared on the lander too. If two rows share a name, the second one is added with a number instead.
- **Duplicate** adds it as a new lander, with a number added to its name, such as `Roof Check - Quiz (2)`.

Your choice applies to every row with a matching name. To choose for each row, pick **Choose Manually**. You can also set it in your CSV, in the `conflict_action` column: `cancel`, `replace`, or `duplicate`. Proferex then switches to **Choose Manually** for you, so you can check each row before you import.

If a row has a problem, such as a page domain that isn't active yet, it is highlighted with the reason. Nothing is imported until every row is fixed, so you never end up with half a list.

Check the rows, then click **Import**. The button shows how many landers you are adding, such as **Import 3 Landers**.

---

## See how each one performs

![The Landers page with filters for lander type, redirect mode, and lander group, and five landers with their visits, clicks, and conversions](/images/docs/landers-list.jpg "Your landers, with their numbers for the date range you pick")

The list shows each lander's visits, clicks, conversions, and the rest of your numbers for the date range you pick. **Clicks** here are visitors who clicked through to the offer, so comparing clicks with visits shows how well each lander warms people up.

Use **Filter by Lander Type**, **Filter by Redirect Mode**, and **Filter by Lander Group** to narrow it down. Click a name to break a lander's numbers down by campaign, offer, country, and more. See [Reading Your Stats](/docs/reports/reading-your-stats/index.md) and [Drill-Downs](/docs/reports/drill-downs/index.md).

---

## Edit, duplicate, or delete

![Two landers ticked in the list, with the Duplicate (2) and Delete (2) buttons outlined at the top](/images/docs/landers-bulk.jpg "Tick rows to duplicate or delete several at once")

Each row has three icons:

- **Copy** copies the lander's address.
- **Edit** opens the lander's settings.
- **Delete** removes the lander. You can't delete a lander while a [combination](/docs/tracker/combinations/index.md) uses it, so remove it from your combinations first. Its past visits and conversions stay in your reports.

Tick several rows to duplicate or delete them all at once. **Duplicate** and **Delete** appear at the top, with the number you picked. You can also duplicate a lander from the **⋯** menu on its own page.

Duplicating saves you from starting from scratch. The copy keeps every setting, and its name ends in (Copy).

### Test a new version of a page

To test a variation of a page, such as a new headline, start in your [Lander Upload](/docs/landing-pages/lander-uploads/index.md), not here. Copy the page, change it, publish it, and give it its own lander:

<ol className="manual-illustrated-steps">
  <li>
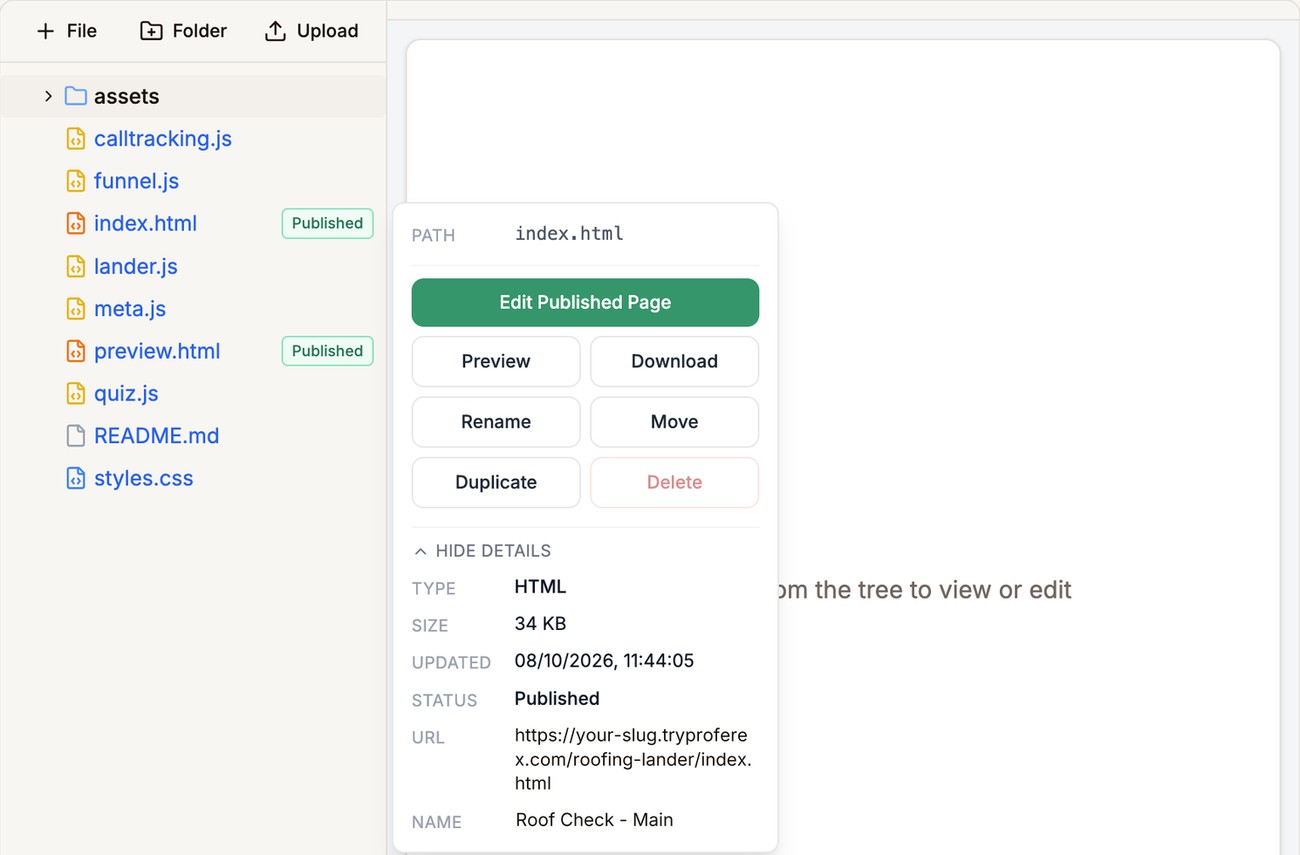
    <p>In the upload's <a href="/docs/landing-pages/file-manager">File Manager</a>, open the page's menu and click <strong>Duplicate</strong>. The copy gets a name such as <code>index copy.html</code>, so click <strong>Rename</strong> on it and give it a short name, such as <code>main-b.html</code>.</p>
    ![The menu for index.html in the File Manager, with the Rename and Duplicate buttons outlined](/images/docs/file-manager-menu.jpg "Duplicate the page, then rename the copy")
  </li>
  <li>
    <p>Open the copy, make your changes, and click <strong>Save</strong>.</p>
  </li>
  <li>
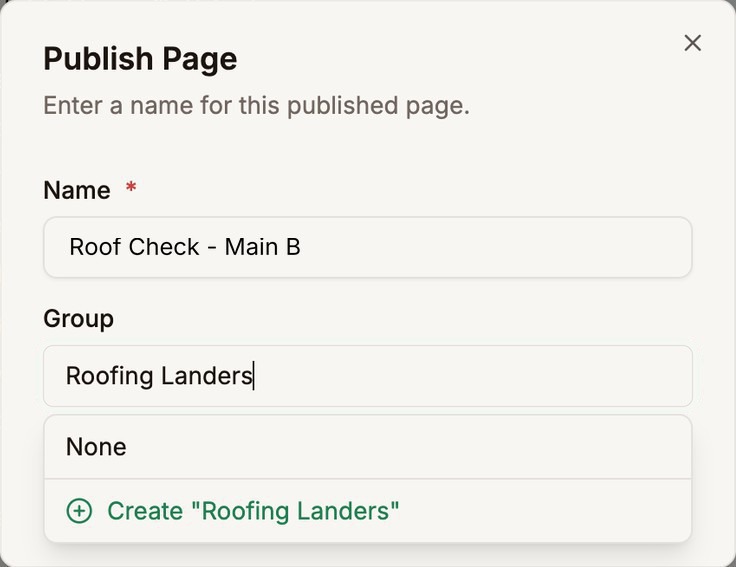
    <p>Click <strong>Publish</strong> next to the copy and name it, such as <code>Roof Check - Main B</code>.</p>
    ![The Publish Page dialog with the name Roof Check - Main B](/images/docs/landers-variant-publish.jpg "Publish the copy under its own name")
  </li>
  <li>
    <p>Create a lander for the new page, as shown in <a href="#published-pages">Published Pages</a> above.</p>
  </li>
  <li>
    <p>Put both landers in your <a href="/docs/tracker/combinations">combination</a> to see which one converts better.</p>
  </li>
</ol>

Once you have done it once, each new variation only takes a couple of minutes.

---

## Next step

Put your landers and offers together. See [Combinations](/docs/tracker/combinations/index.md).